
How to install your
Harmonica SuperStart card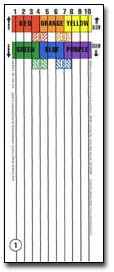
You will want to install your SuperStart card – but don’t do it right away.
Your Harmonica SuperStart system book has you start with various explorations and experiments with your harmonica, without your SuperStart card on yet.
When its time to install your SuperStart card, there are a couple of things to notice first:
- You already have velcro installed on the back of your SuperStart card
- The matching “soft” velcro is already clinging to the back of your SuperStart card
- What you’ll want to do first is pull the soft velcro off of the back of your SuperStart card
- Next, pull the clear plastic from the soft velcro
- Now it is ready for positioning on your harmonica
Your soft velcro needs to be centered on the top part of your harmonica
(the side WITH the numbers)
Here’s the part that’s a little bit non-intuitive:
You want to place the soft velcro TOWARD the BACK of the harmonica, so it is not touching your mouth when you play
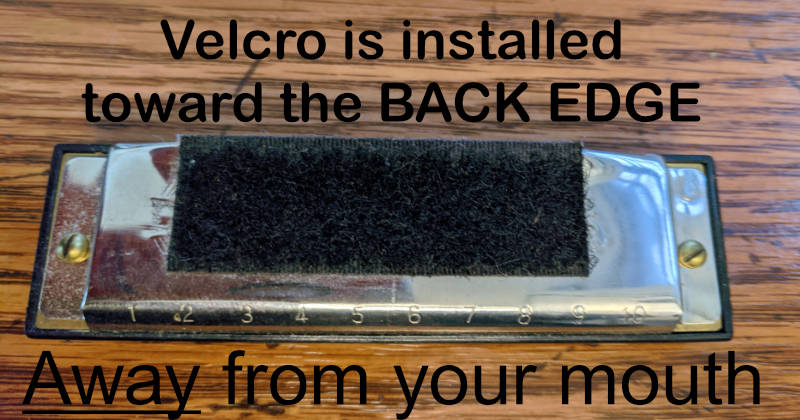
soft velcro Harmonica SuperStart card install
And that’s all there is to it!
As instructed in both the book and the recordings, you then will line up the #1 hole on your harmonica with the #1 (circled) on your SuperStart card, and then all 10 holes will be lined up automatically.
The whole thing together will look something like this:
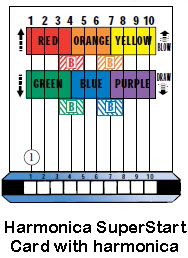
Harmonica SuperStart card: #1 on card lined up with #1 hole on harmonica
You also have a crease on your card just below the colors – people like to adjust the angle of it lots of different ways.
Here’s an example of students using their SuperStart cards from newspaper coverage of one of Artist-In-Residencies at E.A.White Elementary School, Fort Benning, Georgia: